How to create a calendar template in OpenOffice which can be updated dynamically with any year or month. This tutorial also includes a calendar template (.ods)
In this post I will share with you how to make an editable calendar template for OpenOffice in which you can simply change the month or the year and the entire calendar gets updated.
If you’re just looking for an OpenOffice calendar template that you want to print, simply download download one of the .ods files below:
For more styles and designs have a look at these printable calendars.
Before we get started, let me show you the result:

Let’s being by making a new spreadsheet. In the “Start Center” window click on “Spreadsheet” or from the menu select File -> New -> Spreadsheet.
To make sure our calendar will fit nicely on a sheet of paper when printed, we need to first update the default page settings. That can be achieved by selecting Format from the menu and then clicking on Page….
In the “Page” tab change the paper format to the one you want. I opted for “US Letter”, but you can choose A4 if that’s the standard in your country. Next, pick “Landscape” for orientation.
One more thing we need to do in this panel is to set the margins. The default values are fine, but I decided to use “nicer” values.

After you click OK you might notice some darker lines in your spreadsheet. Those lines define the print area.
By default, OpenOffice creates three sheets in a new spreadsheet, but we only need two for this project. So I deleted the third sheet and renamed the first two. The 1st sheet became “Month Calendar” and the second one, “Settings”.

Switch to the “Settings” sheet. Here we’ll define a list with the months. Technically, they can be written in any language, but for this tutorial I used English to keep things simple. This list of month names will be used as the source for a drop-down in the first sheet.

Next, let’s switch back to the “Month Calendar” sheet and then select the first cell (A1). Then, from the menu bar go to Data -> Validate….
A panel called “Validity” should show up on the screen. In the first tab, “Criteria”, choose “Cell Range” from the “Allow” options. Then in the “Source” field we are going to write the formula that defines the range we want: $Settings.$A$1:$A$12. This gets all the cells starting from A1 to A12 in the “Settings” sheet.
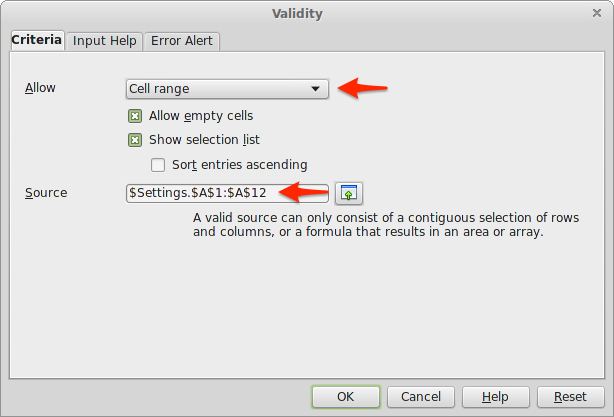
Hit OK and you should see a button with an arrow pointing down next to the first cell. By clicking on that button you should see the drop-down list with all the months.

My approach to making this calendar is to style each part as soon as it’s ready. So since we have the month name section done, let’s style it. I chose to increase the font size to 40 and to make it bold. I also merged the first 3 cells to have more space for the longer month names.

Before we add the year we need to do some work on the layout of the page. Remember, this calendar has to fit on a sheet of paper. We need figure out the width of the first seven columns. We have seven days in a week, so our calendar will be seven columns wide. So we just need to divide the width of our page to 7. Let’s have a look at our page settings again. Go to Format -> Page….
Start your calculator application. To get the column width subtract the margins from the full page divide the result to 7. In my case it’s (11-2*0.75)/7=1.35. Yes, the result is a longer number, but only use the first two decimals. This will make sure the calendar will never be wider than the page width.
Now that we know how wide a column needs to be, select the first seven columns and then from the menu choose Format -> Column -> Width…. Put in the result you got earlier.

Next, let’s add the year. In this design it’s placed on the right side, at the top. You have two options, either write the year or you can use the current year formula =YEAR(TODAY()).

Let’s continue by adding the days of the week in the row under the month and year. For me the week starts on Sunday, but if you’re interested in an example with the week starting on Monday check out the A4 calendar template.

Now that the top section is ready, we get on with the rest. First, we have to know what is the first date in our calendar. Most of the time it’s not going to be the 1st of the current month, but, more likely, one of the last days in the previous month. However, the moment we know that date, we can just add 1 (one day) to that value until we have six rows. I’ll tell you the reason why we want 6 rows, a bit later.
Let’s now focus on how we’re going to get that first date. An idea would be to get the first day of the month. In the A3 cell we need to add this formula =DATE(G1; MATCH(A1; $Settings.A1:A12; 0); 1).
If this formula looks a bit confusing, let me explain how it works. First the DATE function takes 3 parameters: year, month and day. We already have the year in G1. The month is a bit harder because it needs to be a number from 1 to 12. But we only have “March” in the A1 cell. The trick in this case is to look for the position of the word “March” in the month list available in the “Settings” sheet. The MATCH function can do just that. It needs the word to search for, in our case “March” (A1) and where to search it, the cell range A1:A12 in “Settings”. The last parameter has to be “0” for the function to return only the first exact match.

Unfortunately, most months do not start on a Sunday, that would be too easy. So this solution is not enough, but it’s a good place to start.
By knowing the first day of the month we can get the corresponding day of the week. The function required to achieve this is called WEEKDAY and this is the formula we need =WEEKDAY(DATE(G1; MATCH(A1; Settings!A1:A12; 0); 1)). The result you should get is a number from 1 to 7. If that’s not the case change the “Number Format” from “Date” to “General”.

Now we know the weekday. But why do we need it? Let me try to explain by giving you a specific example. For the calendar I used in this tutorial, the first day of the month is a Monday. Since the week starts on Sunday, Monday automatically becomes the 2nd day of the week. That means that if the 1st of March falls on a Monday(the 2nd day), then Sunday would have been 1 day before – on the 28th of February. So we just need to subtract 1 day from the date which is the 1st of the month. The resulting formula is =DATE(G1;MATCH(A1;$Settings.A1:A12;0);1) - (WEEKDAY(DATE(G1;MATCH(A1;$Settings.A1:A12;0);1)) - 1).

From here on it’s smooth sailing. We just need to add one to the previous row cell since we already have the first date in our calendar. So B3 will be =A3+1, C3 will be =B3+1 and so on until we reach the end of the week.

The following row has to remain empty because, if you look at the design, we need some space that is editable. So the next cell we’ll use is A5. But now instead of adding 1 to A3 we’ll have to add 7 (days). This gives us =A3+7, =B3+7 and so on until we reach the end of the second week. Following this logic, we’ll skip the 6th, 8th, 10th and 12th row. As for A7 it will be =A5+7, A13 =A11+7 and so on until we get to the end of our month calendar.
Tip: copying the 5th row and pasting it onto the 7th row will save you time because OpenOffice will auto-update the values.

We’re slowly getting there, but we don’t want the year and month for each day. To only show the actual day number, select all the date cells and right-click on one of them. From the right-click menu choose “Format Cells…”.

In the “Format Cells” dialog window, select the Date category. Then in the “Format Code” text field remove the default code (MM/DD/YY) and write the letter “D” (it means “day”). Click OK.

It’s time again for some simple math. Just how we made sure our calendar will fit within the page width, it also needs to fit within the page height. For the width we had to deal with columns, for the height, with rows. The rows which contain text have a set height, but the empty ones do not. So we need to determine how tall they can be.
To check the height of a row right-click on the left header (where the number is). From the context menu select “Row Height…”.

The total height of the page, in my case, is 8.5”. From this we need to subtract the margins (2 * 0.75”) and the combined height of the rows containing text (2.05”). So 8.5 – 2 * 0.75 – 2.05 = 4.95.
Now we need to divide this number (4.95) by 6. Why 6? Because there is an empty row below each week and our calendar must fit six weeks. The result is 0.825, the height of an empty row. Of course, I will use only the first two decimals from this value, 0.82. Just to be safe.

While things are looking better, we still have to add some borders. Have a look at the image below and make a similar selection:

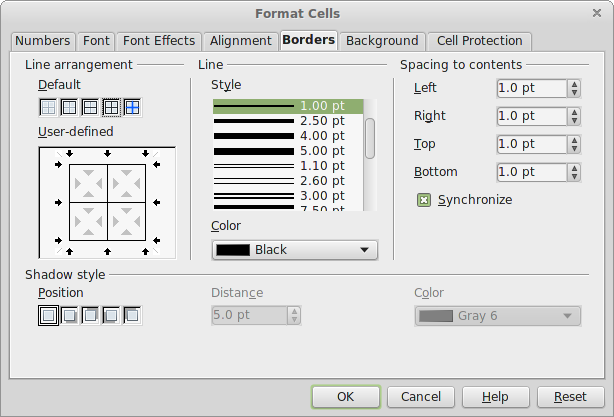
To apply a border to these cells, right-click the selection and choose “Format Cells…” from the context menu. From the modal window select the “Borders” tab and then choose settings like you see in the following screenshot:
Before our calendar is ready for “Print Preview” we still have to do a couple of things. First let’s hide the header and footer of the document. Because they just take space and we don’t need them. Go to Format -> Page… and then in the “Header” tab uncheck “Header on”. You can do the same for the Footer.

One other thing we should do before our calendar is print-ready is to define the area that we want to be printed. Make a selection like you see below then go to Format -> Print Ranges -> Define.

Now we can check how “Print Preview” looks like. Go to File -> Print Preview.

It’s pretty much ready, but we can make it a bit nicer by removing the bottom border for the days and the top border for events. To have actual day boxes.
Removing a border is not too difficult. Select the cells for which you want change the border. Then right-click on them and choose “Format Cells…”.
From the modal window select the “Borders” tab and in the border preview section double-click on the border you want to remove.

Another look at the final result:

If you’re interested in knowing how to make the previous and following month days to be less visible, I recommend you download the calendar template. You’ll see that it involves using “Conditional Formatting”. I might add that part as well in the future if there’s enough interest.